How to setup a new Web Version account
📚 What This Guide Covers
This guide walks you through setting up your SureFire Web Version account. You will learn how to:
- Create user accounts - Set up admin and preparer usernames
- Assign user roles - Configure permissions for different users
- Create tax form templates - Set default forms for your office
- Configure preparer information - Add PTIN and office details
⚠️ Before You Begin
You will need:
- Administrator access - Initial setup requires admin login
- Your office information - Address, phone, and other details
- Preparer information - Names and PTIN numbers for your team
- Default tax forms list - Know which forms to include in your templates
📊 Step-by-Step Setup
Step 1: Log In as Administrator
Your initial admin login provides full access to configure the entire system.
- Navigate to your SureFire Web Version login page
- Log in with your administrator credentials
- You will be prompted to create a new password
- Tip: Copy and paste the password into the field for accuracy
Step 2: Create User Accounts
Create usernames for all team members who will use the system.
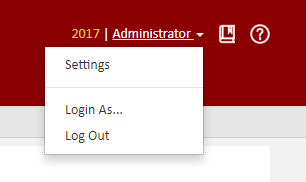
- Click ADMINISTRATOR in the top-right corner
- Select SETTINGS
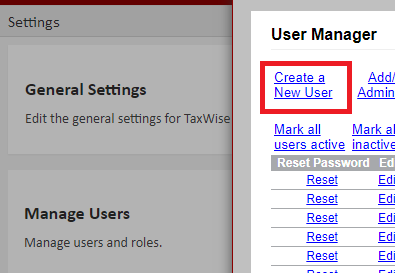
- Click Manager Users
- Click Create New User or Add User
Step 3: Assign User Roles and Permissions
User roles determine what actions each user can perform in the system.
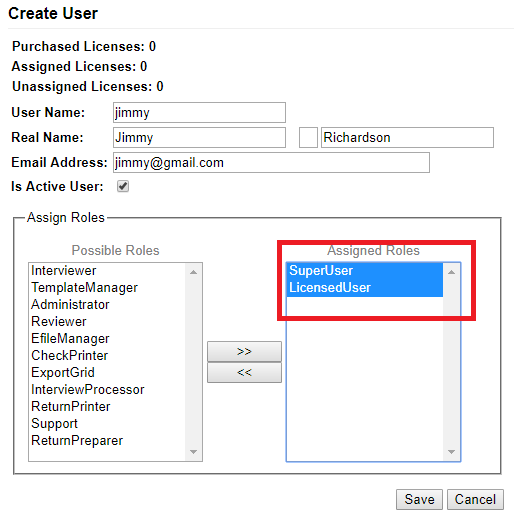
- Enter the new username for the user
- On the right side, locate the User Role(s) box
- IMPORTANT: Select SuperUser AND set the user as a LICENSED USER
- Click Save
Step 4: Understanding User Roles
Each role provides different capabilities. Choose based on what each user needs to do.
📋 Available User Roles
- Administrator - System administrator. Do NOT assign this to preparers or regular users, as they may lose access to preparer features
- SuperUser - Can create returns, create and send e-files. Most preparers should have this role
- ReturnPreparer - Can only create returns. Cannot send e-files
- Interviewer - Can only use interview mode. Limited to data entry
- CheckPrinter - Can print checks. Add this role if the user needs check printing capabilities
- LicensedUser - REQUIRED for all users who will log in. Without this, users will get an "unauthorized user" error
Step 5: Understanding Default Passwords
When you create a new user, the default password matches the username exactly, including case sensitivity.
- When a new user logs in for the first time, the password equals the username
- Note: Passwords are case-sensitive
💡 Password Examples
- If username is "jimmy", password is "jimmy"
- If username is "JoSh", password is "JoSh" (with capital J and capital S)
- If username is "RickSmith", password is "RickSmith"
Users should change their password after first login for security.
Step 6: Create Tax Form Templates
Templates define which tax forms appear when creating a new return.
- Go to ADMINISTRATOR → SETTINGS
- Click Return Templates
- Click Create New Template
Step 7: Configure Template Settings
Name your template and set it as the default for your office.
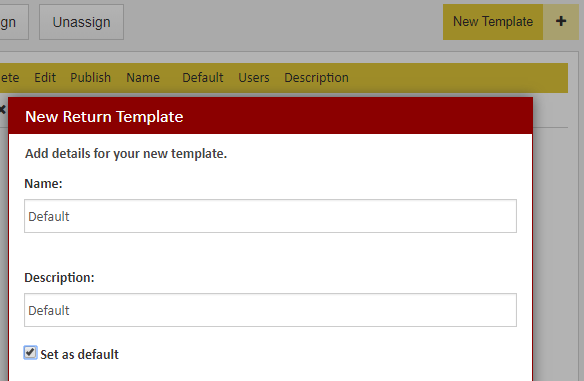
- For Name, enter "Default" (or your preferred name)
- For Description, enter "Default"
- IMPORTANT: Check the box for Set as default
- Click Save
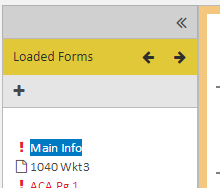
Step 8: Edit Template and Add Forms
Add the tax forms that your office typically uses.
- After saving, you will see your template listed
- Click the Edit Icon next to your template
- You will see a default tax return form
Step 9: Add Standard Forms
Include the forms your office uses regularly.
- Click the (+) Add Form button on the left side
- Add these standard forms:
- Main Info
- 8879 (IRS Form 8879)
- Price (for setting fees)
- After adding each form, configure it as needed
💡 Pricing Form Tips
For the Price sheet:
- You don't need to itemize every single line item
- You can set a flat rate (e.g., $500 for all 1040 returns)
- This won't cause diagnostic or e-file errors
- You can override prices on individual returns if needed
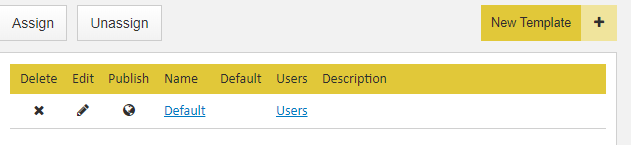
Step 10: Assign Template to Users
Assign your template to the users who will use it.
- After finishing your template setup, click [Assign]
- Select all users who should use this template
- Click Save
- Now when these users create returns, they will see your configured forms
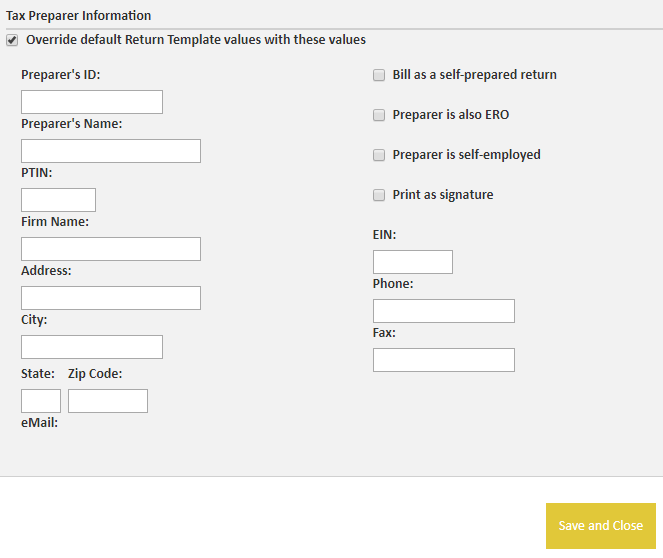
Step 11: Preparer Account Setup (Per User)
Each preparer should configure their own PTIN and other personal information.
- Each user should log in with their own username
- Click Settings in the top right corner
- Select General Settings
- Enter their PTIN number (Tax professional identification number)
- Update other professional information as needed
📞 Still Need Help?
If you are having trouble setting up your Web Version account, contact our support team:
Phone: 1-800-516-9442
Tags: web,setup,getting-started